Double Stitch is the brainchild of the multi-talented twin designers Erika and Monika Simmons that has evolved from a collection of show stopping handmade crochet apparel, to The Double Stitch Twins, a brand that influences the rapid pulse of fashion for past, present and future crochet artists and admirers. They’ve been featured on numerous television shows and in magazines. Their designs have been featured at Macy's in Chicago and they have authored 3 crochet pattern books entitled, Double Stitch: Designs for the Crochet Fashionista with Interweave Press, Fashion Forward and The Crochet Fashionista Workshop with Red Heart Yarn.  The Double Stitch Twins were recently pleased to win the Crochet Liberation Front’s coveted, 2011 Flamie Award for Best Crochet Designers Accessories.
“Why we love Yarn! Yarn is our paint, so it represents a freedom and infinite fashionable possibilities! Various shapes, colors and silhouettes are what we envision and it's a joy for us to discover with yarn everyday.”
I Love Yarn Shrug
Designed by Double Stitch Twins.
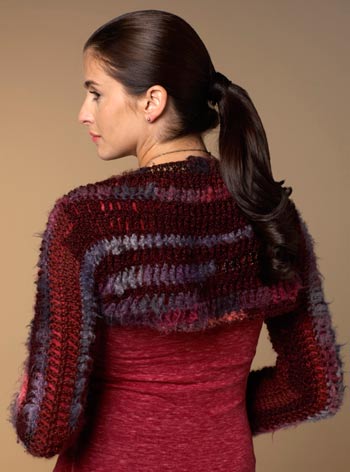 Celebrate I Love yarn Day with this lovely bolero.
Directions are for size Small; changes for sizes Medium, Large are in parentheses.
Sleeve Circumference: 12 (14, 16)" [30.5 (35.5, 40.5)cm]. Length From Cuff To Cuff: 70" [178cm].
RED HEART® Boutique™ Magical™: 2 (3, 3) balls 1901 Open Sesame. Art E787 available in 3.5 oz (100 g), 190 yd (174 m) balls. Susan Bates® Crochet Hook: 5.5mm [US I-9]. Yarn needle.


Gauge
8 tr = 4" [10cm]; 2 rows = 2¼" [5.5cm]. CHECK YOUR GAUGE. Use any size hook to obtain the gauge.
Abbreviations
ch = chain dc = double crochet mm = millimeters sc = single crochet st(s) = stitch(es) tr = triple or treble crochet.
Note
Shrug is worked lengthwise.
Shrug
Ch 143. Row 1: Tr in 4th ch from hook and in each ch across, turn – 140 tr. Row 2: Ch 4 (counts as tr here and throughout), tr in each tr across, turn – 140 tr. Row 3: Ch 3 (counts as dc here and throughout), dc in each tr across, turn – 140 dc. Row 4: Ch 4, tr in each dc across, turn. Row 5: Ch 4, tr in each tr across, turn. Repeat Rows 3-5 until piece measures 12 (14, 16)" [30.5 (35.5, 40.5)cm]. Do not fasten off.
Finishing
With right sides together, fold piece lengthwise. Working through both layers, sc first 47 sts of foundation ch together with sts of last row to join, sc in each of center 46 sts, sc through both layers to join last 47 sts. Fasten off. Weave in ends.
©2012 Coats & Clark
For more ideas & inspiration – www.redheart.com www.coatsandclark.com www.crochettoday.com
Textured Handbag
Designed by Double Stitch Twins.
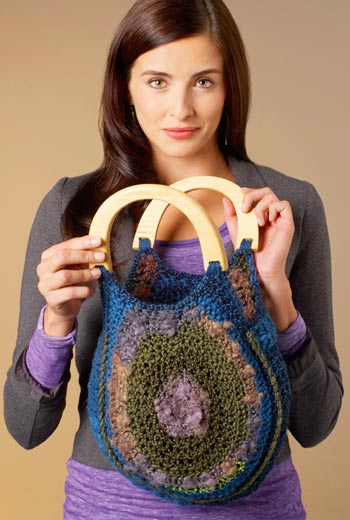 Celebrate I Love Yarn Day with this easy handbag.
Handbag is 14" [35.5cm] diameter.
RED HEART® Boutique™ Magical™: 1 ball 1621 Wizard A. Art E787 available in 3.5 oz (100 g), 190 yd (174 m) balls. RED HEART® Boutique™ Midnight®: 1 ball 1937 Moonlight B. Art. E786, Available in 2.5 oz (70g), 153 yd (140m) balls. Susan Bates® Crochet Hook: 6.5mm [US K-10½]. wooden purse handles yarn needle


Gauge
8 dc = 3" [7.5cm]; 7 rows = 4" [10cm]. CHECK YOUR GAUGE. Use any size hook to obtain the gauge.
Abbreviations
A, B, C = Color A, B, C ch = chain dc = double crochet hdc = half double crochet mm = millimeters sc = single crochet st(s) = stitch(es) * or ** = repeat whatever follows the * or ** as indicated.
Front
With A, ch 4, slip st in first st to form a ring. Round 1: Ch 4 (counts as dc and ch 1), *dc in ring, ch 1; repeat from * 6 more times, slip st in 3rd ch of beginning ch to join – 8 dc and 8 ch-1 spaces. Round 2: Ch 3 (counts as dc here and throughout), *2 dc in next ch-1 space, dc in next dc; repeat from * around, 2 dc in last ch-1 space, slip st in top of beginning ch – 24 dc. Round 3: Ch 3, dc in next dc, *2 dc in next dc, dc in next 2 dc; repeat from * around, 2 dc in last dc, slip st in top of beginning ch – 32 dc. Round 4: Ch 3, dc in next 2 dc, *2 dc in next dc, dc in next 3 dc; repeat from * around, 2 dc in last dc, slip st in top of beginning ch – 40 dc. Round 5: Ch 3, dc in next 3 dc, *2 dc in next dc, dc in next 4 dc; repeat from * around, 2 dc in last dc, slip st in top of beginning ch – 48 dc. Round 6: Ch 3, dc in next 4 dc, *2 dc in next dc, dc in next 5 dc; repeat from * around, 2 dc in last dc, slip st in top of beginning ch – 56 dc. Round 7: Ch 3, dc in next 5 dc, *2 dc in next dc, dc in next 6 dc; repeat from * around, 2 dc in last dc, slip st in top of beginning ch – 64 dc. Round 8: Ch 3, dc in each dc around, slip st in top of beginning ch. Fasten off. Row 9: Join B in any st, ch 3, dc in next 58 dc, turn, leave remaining sts unworked. Row 10: Ch 3, dc in each dc across. Fasten off.
Back
Work as for Front, reversing colors and beginning with B and changing to A on Row 9.
Side Panel
With B, ch 10.
Row 1: Working in back nubs of ch, dc in 3rd ch from hook and in ch across, turn – 8 dc. Row 2-39: Ch 3, dc in each dc across, turn – 8 dc. Fasten off.
Finishing
Measure and mark 2½" [6.5cm] from first and last st of Row 10 along outside edges of Front and Back. With right side facing, pin long edge of Side Panel along outside edges of Front, beginning and ending where marked. With right side facing and working through both layers, join A at beginning of Side Panel and sc pieces together. Fasten off. Repeat to attach opposite long edge of Side Panel around outside edge of Back.
Edging
Join B in any st and work hdc evenly spaced along top edges of Handbag. Fasten off.
Handles
With B, sew handles to Front and Back securely. Weave in ends.
©2012 Coats & Clark
For more ideas & inspiration – www.redheart.com www.coatsandclark.com www.crochettoday.com
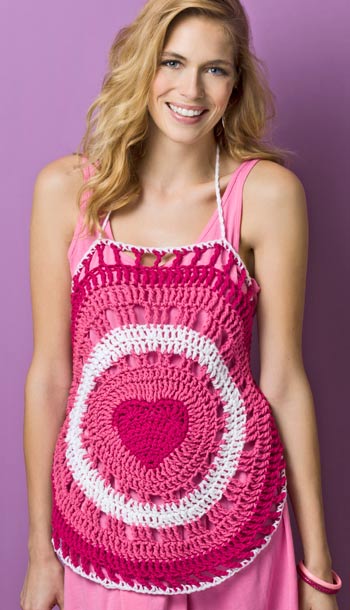
Heartfelt Halter
LW2809
Perfect for any day you want to show a little “heart”, this easy-wearing halter is made in a simple circle that begins in the center and has simple to make ties.
Size
Directions are for size Small/Medium. Changes for sizes Large, X-Large are in parentheses.
What you will need
RED HEART® “With Love®”: 1 skein each of 1701 Hot Pink A, 1703 Candy Pink B, and 1001 White C. Art. E400 available in solid color 7 oz (198 g), 390 yd (357 m) and multi color 5 oz (141 g), 230 yd (211 m) skeins. Crochet Hook: 8mm [US L-11] yarn needle stitch markers


Gauge
12 sts = 4"; 8 rows = 4", in half double crochet CHECK YOUR GAUGE. Use any size hook to obtain the gauge.
Measurements:
Finished Width: 21 (23, 25)" Finished Length: 21 (23, 25)"
Note: Piece is stretchy and will fit a range of sizes. Placing ties carefully also allows for customizing the fit.
Abbreviations
A, B, and C = Colors A, B, and C ch = chain dc = double crochet hdc = half double crochet sc = single crochet; st(s) = stitch (es) tr = treble (triple) crochet () = work directions in parentheses into same st * = repeat whatever follows the * as indicated.
Special Technique
adjustable ring Holding the yarn a few inches from the end, wrap around your finger. Do not remove wrap from finger, insert hook into the wrap and draw up a loop of working yarn. Chain one to secure the loop, and remove ring from finger. Work stitches of first round in the ring. Pull gently, but firmly, on tail to tighten ring.
NOTE: The center heart is worked first. Then stitches are worked around the heart, in joined rounds.
Center Heart
With A, make an adjustable ring. Row 1: Ch 2 (does not count as a st here and throughout), 3 hdc in ring, turn—3 hdc.
Row 2: Ch 2, 2 hdc in first st, hdc in next st, 2 hdc in last st, turn—5 hdc.
Rows 3–5: Ch 2, 2 hdc in first st, hdc in each st across to last st, 2 hdc in last st, turn—11 hdc at end of Row 5.
Row 6: Ch 2, turn, hdc in each st across, turn.
Row 7: Skip first 2 sts, (2 dc, 2 tr, 2 dc) in next st, skip next 2 sts, slip st in next st, skip next 2 sts, (2 dc, 2 tr, 2 dc) in next st, skip last 2 sts, slip st in top of beginning ch.
Begin Working in Rounds
Round 8 (Right Side): Ch 1, do not turn, working in ends of rows down side of heart, work 7 sc evenly spaced across side edge, 3 sc in adjustable ring at point, 7 sc evenly spaced across other side edge, 2 sc in each of next 2 dc, 2 sc in each of next 2 tr, 2 sc in each of next 2 dc, slip st in next slip st, 2 sc in each of next 2 dc, 2 sc in each of next 2 tr, 2 sc in each of next 2 dc; join with slip st in first sc—42 sts. Fasten off A.
Round 9: With Right Side facing, join B with slip st in same st as join, ch 4 (counts as first tr here and throughout), tr in same st as join, tr in next 2 sts, *2 tr in next st, tr in next 2 sts; repeat * around; join with slip st in top of beginning ch—56 sts.
Round 10: Ch 3 (counts as dc here and throughout), dc in each tr around; join with slip st in top of beginning ch.
Round 11: Ch 3, dc in same st as join, *ch 3, skip next dc, dc in next 2 dc; repeat * around to last dc, ch 3, skip last dc; join with slip in top of beginning ch—38 dc and 19 ch-3 spaces. Fasten off B.
Round 12: With Right Side facing, join C with slip st in same st as join, ch 3, dc in next dc, 2 dc in next ch-3 space, *dc in next 2 dc, 2 dc in next ch-3 space; repeat from * around; join with slip st in top of beginning ch—76 sts.
Round 13: Ch 3, dc in next 2 dc, 2 dc in next dc, *dc in next 3 dc, 2 dc in next dc; repeat * around; join with slip st in top of beginning ch—95 sts. Fasten off C.
Round 14: With Right Side facing, join B with slip st in same st as join, ch 4, tr in same st, tr in next dc, *ch 2, skip next dc, tr in next 3 dc; repeat * around to last dc, ch 2, skip last dc; join with slip st in top of beginning ch—72 tr and 24 ch-2 spaces.
Round 15: Ch 4, tr in next 2 tr, 2 tr in next ch-2 space *tr in next 3 tr, 2 tr in next ch-2 space; repeat from * around; join with slip st in top of beginning ch—120 sts. Fasten off B.
Round 16: With Right Side facing, join A with slip st in same st as join, ch 4, tr in each tr around; join with slip st in top of beginning ch.
Sizes Large and X-Large Only
Round 17: Ch 4, tr in next 4 tr, 2 tr in next tr, *tr in next 5 tr, 2 tr in next tr; repeat from * around; join with slip st in top of beginning ch—140 tr.
Size X-Large Only
Round 18: Ch 4, tr in each tr around; join with slip st in top of beginning ch.
All Sizes
Round 17 (18, 19): Ch 6 (counts as tr, ch-2), skip next tr, *tr in next tr, ch 2, skip next tr; repeat from * around; join with slip st in 4th ch of beginning ch—60 (70, 70) tr and 60 (70, 70) ch-2 spaces. Fasten off A.
Round 18 (19, 20): With Right Side facing, join C with slip st in same st as join, ch 1, sc in same st, 2 sc in next ch-2 space, *sc in next tr, 2 sc in next ch-2 space; repeat from * around; join with slip st in first sc—180 (210, 210) sts. Fasten off C.
Finishing
Ties
Place two markers to indicate front neck. Place the markers in stitches of last round, about 8” apart, and centered above heart. With C, ch 50, join with slip st in first marked st (for first neck tie), working in sts of last round and working down side of piece (not across neck), slip st in each st for about 9 (9½, 10)”, ch 80 (for first back tie). Fasten off. Repeat this process to work the 2nd neck tie (joining to 2nd marked st) and 2nd back tie. Remove markers. Weave in ends.
For more ideas & inspiration - www.redheart.com - www.crochettoday.com - www.knittingtodaymag.com
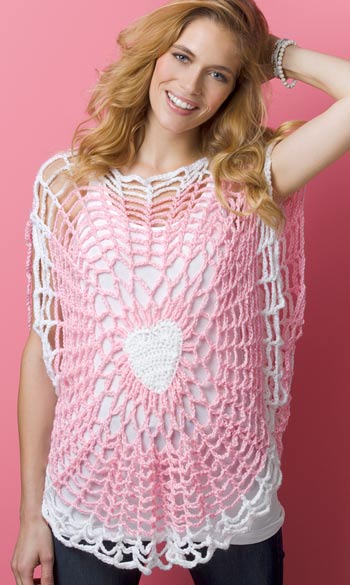
Lighthearted Tunic
LW2810
Show your “heart” coming and going. It’s as fun to make as it is to wear. This trendy tunic is perfect for casual jeans wearing or for dressing up over a slinky dress.
Size:
Tunic measures 25” wide and 25” long. Tunic will drape and stretch to fit a large range of sizes.
Supplies:
RED HEART® “Soft Yarn”: 1 skein each of 6768 Pink A, and 4600 White B. Crochet Hook: 5mm [US H-8]. yarn needle stitch markers


Gauge
13 sts = 4”; 4 rows = 4”, in double crochet CHECK YOUR GAUGE. Use any size hook to obtain the gauge.
Abbreviatons
A, and B = Colors A, and B; ch = chain; dc = double crochet; hdc = half double crochet; sc = single crochet; st(s) = stitch (es); tr = treble (triple) crochet; () = work directions in parentheses into same st; [ ] = work directions in brackets the number of times specified; * or * = repeat whatever follows the * or ** as indicated.
Special Technique
adjustable ring Holding the yarn a few inches from the end, wrap around your finger. Do not remove wrap from finger, insert hook into the wrap and draw up a loop of working yarn. Chain one to secure the loop, and remove ring from finger. Work stitches of first round in the ring. Pull gently, but firmly, on tail to tighten ring.
Notes
The center heart of each piece is worked first. Then stitches are worked around the heart, in joined rounds.
Tunic is reversible, and can be worn with either piece facing front.
First Piece
Center Heart
With A, make an adjustable ring.
Row 1: Ch 2 (does not count as a st here and throughout), 3 dc in ring, turn—3 dc.
Row 2: Ch 2, 2 dc in first st, dc in next st, 2 dc in last st, turn—5 dc.
Rows 3–5: Ch 2, 2 dc in first st, dc in each st across to last st, 2 dc in last st, turn—11 dc at end of Row 5.
Row 6: Ch 2, turn, dc in each st across, turn.
Row 7: Skip first 2 sts, 5 tr in next st, skip next 2 sts, slip st in next st, skip next 2 sts, 5 tr in next st, skip last 2 sts, slip st in top of beginning ch.
Begin Working in Rounds
Round 8 (Right Side): Ch 1, do not turn, working in ends of rows down side of heart, work 10 hdc evenly spaced across side edge, 3 hdc in adjustable ring at point, 10 hdc evenly spaced across other side edge, 2 hdc in each of next 5 tr, slip st in next slip st, 2 hdc in each of next 5 tr; join with slip st in beginning ch—44 sts. Fasten off A.
Round 9: With Right Side facing, join B with slip st in same st as join, ch 4 (counts as first tr here and throughout), tr in same st as join, ch 5, skip next st, *2 tr in next st, ch 5, skip next tr; repeat * around; join with slip st in top of beginning ch—44 tr and 22 ch-5 spaces.
Round 10: Slip st in each of next 3 ch, ch 10 (counts as hdc, ch-8), *hdc in next ch-5 space, ch 8; repeat from * around; join with slip st in 2nd ch of beginning ch—22 hdc and 22 ch-8 spaces.
Round 11: Slip st in each of next 5 ch, ch 10 (counts as hdc, ch-8), *hdc in next ch-8 space, ch 8; repeat from * around; join with slip st in 2nd ch of beginning ch—22 hdc and 22 ch-8 spaces.
Round 12: Ch 7 (counts as dc, ch-4), dc in next ch-8 space, ch 4, *dc in next hdc, ch 4, dc in next ch-8 space, ch 4; repeat from * around; join with slip st in 3rd ch of beginning ch—44 dc and 44 ch-4 spaces. Fasten off B.
Place markers for increase locations: Place piece on a flat surface. Identify the 10 ch-4 spaces of the last round, centered above the heart. Place a marker in the dc before these 10 center ch-4 spaces and place another marker in the dc following the center ch-4 spaces. Continuing around the piece, skip the next 10 ch-4 spaces and place another marker in the next dc. Skip the next 14 ch-4 spaces and place another marker in the next dc. As the following rounds are worked, move the markers into the ch-2 space of the (dc, ch 2, dc) worked at each marked location. Round 13: With Right Side facing, join B with slip st in any of the marked dc, ch 5 (counts as ch-2, dc), dc in same st, [ch 5, *dc in next dc, ch 5; repeat from * to next marked dc, (dc, ch 2 dc) in marked dc] 3 times, ch 5, **dc in next dc, ch 5; repeat from ** to end of round; join with slip st in 3rd ch of beginning ch—48 dc and 48 ch-5 spaces.
Rounds 14–18: Slip st in next ch-2 space, ch 5, dc in same ch-2 space, [ch 6, *dc in next dc, ch 6; repeat from * to next marked ch-2 space, (dc, ch 2 dc) in ch-2 space] 3 times, ch 6, **dc in next dc, ch 6; repeat from ** to end of round; join with slip st in 3rd ch of beginning ch. Fasten off B.
Round 19: With Right Side facing, join A with slip st in any marked ch-2 space, ch 5, dc in same ch-2 space, [ch 8, *dc in next dc, ch 8; repeat from * to next marked ch-2 space, (dc, ch 2 dc) in ch-2 space] 3 times, ch 8, **dc in next dc, ch 8; repeat from ** to end of round; join with slip st in 3rd ch of beginning ch.
Rounds 20 and 21: Slip st in next ch-2 space, ch 5 (counts as ch-2, dc), dc in same ch-2 space, [ch 8, *dc in next dc, ch 8; repeat from * to next marked ch-2 space, (dc, ch 2 dc) in ch-2 space] 3 times, ch 8, **dc in next dc, ch 8; repeat from ** to end of round; join with slip st in 3rd ch of beginning ch. Fasten off A. Remove markers.
Second Piece
Work same as First Piece, using B for the heart, A for
Rounds 9–18, and B for Rounds 19–21.
Finishing
Place one piece on top of the other pieces, with Right Sides together, with hearts matching, and stitches of last round matching. Work from the Wrong Side of the pieces.
Place markers for neck edges: Identify the 4 ch-8 spaces of the last round, centered above the heart. Place a marker in the dc before these 4 center ch-8 spaces, and place another marker in the dc following the center 4 ch-8 spaces (for neck edges). Seam first shoulder and side: Work through both thicknesses. Join B with slip st in one of the marked dc.
Working in sts of last round and working down side of pieces (not across neck), sc in next 8 ch, [sc in next dc, sc in next 8 ch] 2 times, fasten off (shoulder seamed), skip next 6 chspaces, join B with slip st in next dc, sc in next 8 ch, [sc in next dc, sc in next 8 ch] 3 times, fasten off (side seamed).
Seam second shoulder and side: Join B with slip st in other marked dc. Working in sts of last round, down other side of pieces, work second shoulder and side seams in same manner as first shoulder and side seams.
Weave in ends. Turn tunic Right Side out.


