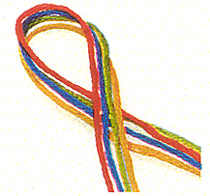
 Have you done "The Wrap?" Try it. It's fun and fashionable too. All you need is a friend to help you and a favorite thread or yarn and the following instructions. Special thanks to Susan Bates, makers of Anchor Embroidery Floss and Pearl Cotton, for sharing these instructions and for reassuring us that wrapping also works beautifully with yarn.
Materials:
The amount of thread or yarn you will need will depend on the type thread or yarn you use, the number of colors you select, the length of your hair and the number of wraps you create.
Before you start:
Cut the thread or yarn to the desired length. (If your hair is long, you may need three or more yards of each color.) If you are mixing colors, cut each color to the desired length and hold them together.
Choose a wisp of hair at your temple or along the part and braid it halfway.
Hint: To avoid tangling and wrapping in other hair, cut a slit to the middle of a piece of cardboard and pull the wisp of hair through.
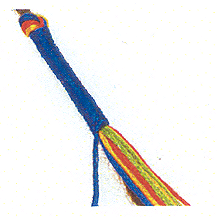
Step 1 - The Beginning
Using an overhand knot, tie the consolidated threads around the braided hair about 1/2"-3/4" from the hairline, leaving a long and a short end: plan the knot so that the short end is 6" longer than your hair.
For a fancier beginning, when making the knot, bring the threads through the loop five times instead of just once. Now bring the braided hair through this loop. Place the loop about 1/2"-3/4" from the hairline as above; pull the short end to tighten.
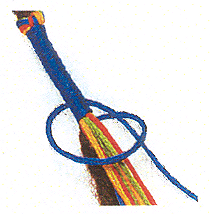
Step 2 - Do The Wrap
Hold the braid and the threads together as one. To start, pull out a long end of one color and wrap firmly around the entire group of braid and threads forming a solid band of color.
Tip: Wind the long wrapping thread into a loose bundle to wrap more quickly and avoid tangling with the other threads.
To change color, wrap the working thread end loosely around and bring the end of this thread through the loop from the top to the bottom. Pull it tight and hold it with the other wrapped threads.
To create striped patterns, pull out a long end of two different colors and wrap with both at the same time, keeping them parallel. Finish each thread off by itself as described above.
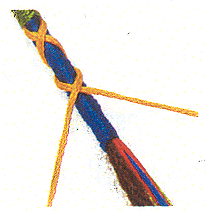
To create a crossed pattern, pull out a long and a short end of the first color and hold away from work. Pull out the long end of the second color and wrap an inch or more of the braid as usual without wrapping over the first color, then finish off this thread. Now cross the long and the short end of the first color over the wrapped thread repeatedly for desired effect. Finish off each end.
To create a band of color, change the colors and the widths of the wrapping and make your own patterns. Wrap wide and narrow different color bands. Combine plain bands of color on either side of a striped band. Experiment!
Step 3 - To End
Wrap for 1"-1 1/2" beyond the length of your hair. Tie all ends in a knot and trim to the desired length.
Personalize your Wrap: Pearls, beads, buttons or other fun washable accessories can be added to the threads or yarn before the finishing knot.
You don't have to redo The Wrap every day. You can wear it as long as three weeks. Just wash and dry your hair as usual, but to keep the threads or yarn shiny limit use of spray and styling solutions.
To undo the Wrap, gently unwind the wraps and untie the finishing knots.
©2001 Craft Yarn Council of America