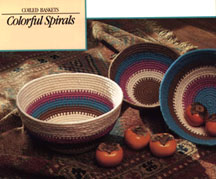
 These coiled baskets are a cinch to make. Essentially, all you have to do is to wind double strands of yarn around a core of everyday clothesline. You shape the baskets with your hands as you work to achieve the desired size and shape. Change colors every few rows to create a pattern. These baskets were made using standard size mixing bowls as inspiration for size: this way you have the option of using a clear Pyrex bowl inside your basket if there are occasions when you want to use a basket to hold food. However, other uses include mail, fruit, dried flowers, pine cones, Easter Eggs, Christmas balls or supplies for needlework to name just a few. Choice of sizes and shapes and pattern variations are as endless as your imagination.
Materials:

- 3/16" diameter cotton clothesline (two 100' packages will make all three baskets)
- 4-ply knitting worsted weight yarn (we used the following colors and amounts for these three baskets:
- 1, 4 oz. skein of Rose Pink,
- 1, 4 oz. skein of Turquoise,
- 2, 4 oz. skeins of White and
- 1, 4 oz. skein of Light Brown
- Blunt end, #16 tapestry needle
- Masking tape, to cover cut ends of clothesline *Scissors.
General Directions:
- Begin at the center of the bottom by forming the coil. To do this, taper one end of the clothesline with scissors. Thread tapestry needle with about 6 feet of yarn and then double the yarn...always use the double strand of yarn to cover the clothesline core.
Place about 1 inch of the yarn next to the end of the clothesline and then wrap the two tightly together with some of the remaining yarn as shown in Illustration A. As you can see, you wrap, moving the cut end of the clothesline.
- Pinch the covered clothesline core to bend and hold in place. Using needle, work Figure 8's over and under the core, toward the tapered end, until it is covered with yarn as shown in Illustration B.
- Coil yarn-covered end around to start the circular shape. If necessary, repeat another Figure 8 to hold first coil in place, then work three winds around core, followed by a Figure 8 to attach to previous coil. See Illustration C.
This is the basic pattern that you will continue on the rest of the basket: Three winds to cover the clothesline core, a Figure 8 to connect two rows, three winds, a Figure 8, etc.
- When you need to add on more yarn or change to a new color, here's what you do: when 2"—3" remain, cut the needle off and lay the yarn ends along the clothesline core; thread another needle and then place the ends of the new yarn next to the ends of the old yarn and secure in place by winding the new yarn over them until covered. See Illustration D.
- To end a basket, taper the clothesline about 1 inch from the end. Securely attach the last row end to the previous row with Figure 8's and then wrap the yarn around the last row end and the previous row as if they were both one. Thread yarn back through the Figure 8's and cut off.
Large Basket
(10 1/4"—diameter x 5 1/2"—high)
Materials:
- 48′ clothesline
- worsted weight acrylic yarn:
- 1 oz. each of Rose, Turquoise, Light Brown 3 oz. of White.
Directions: Work 9 rows of White for the bottom and then shape the sides in this order: 7 more rows of White, followed by 3 rows each of Brown, Turquoise and Rose and then end with 7 rows of White.
Medium Basket
(9 3/4"—diameter x 5 1/4"—high)
Supplies:
- 40' clothesline, 1 ounce each of White, Light Brown, Turquoise and Rose.
Directions: Work 7 rows of Turquoise and one row of Rose for the bottom. Shape the sides in this order: 4 more rows of Rose, 5 rows of White and Brown and then end with 5 rows of Turquoise
Small Basket
(8 3/4"—diameter x 4"—high)
Supplies:
- 35' clothesline, 1 ounce each of White, Turquoise, Rose and Light Brown.
Directions: Work 7 rows of Brown for the bottom. Shape the sides in this order: 4 rows of White, 4 rows of Rose and then end with 4 rows of Turquoise.
Every effort has been made to ensure the accuracy and completeness of these instructions. We cannot be responsible, however, for variances in individual techniques, human errors or typographical mistakes.
