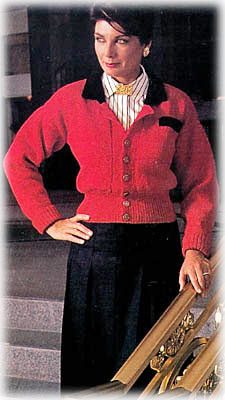
 The fashion adage: Classics never go out of style, best describes this knitted cardigan jacket with contrasting collar and pocket trim. Perfect for the office or an evening out.
Sizes:
Directions are Size 6-8. Changes for 10-12, 14-16, and 18 in parenthesis. (See Finished Measurements diagrams and chart at the end of the pattern.)
Materials:
- 4-ply Worsted Weight Acrylic Yarn—
- Red (Main Color A) 14 (18, 21, 21) ozs.
- Black (Contrasting Color B) 3.5 ozs. regardless of which size you are making.
- Knitting needles size 5 and 7, or size to obtain gauge
- 6 Buttons
- Stitch markers
- Yarn needle for finishing
Gauge: Stockinette stitch (st st) on larger needles:
- 18 stitches (sts) = 4
- 24 rows = 4
- To save time, take time to check gauge.
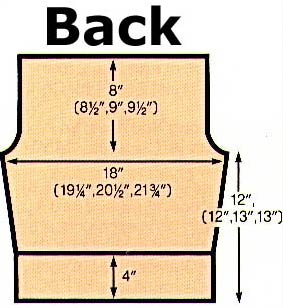
Back:
With smaller needles and Main Color A, cast on 79 (85, 91, 97) sts.
Ribbing:
Row 1: Right side, *Knit (k) 1, Purl (p) 1; repeat from *, end K 1.
Row 2: *P 1, K 1: rep from *, end P 1. Rep these 2 rows for ribbing for 4", end with a wrong side row. Change to larger needles and K 1 row, increase (inc) 1 st within row — 80 (86, 92, 98) sts. Work even in st st, starting with a P row. Work even until 12 (12, 13, 13)" from beginning or desired length to underarm. Place a marker at each end for armholes. Work even until armhole measures 8 (81/2, 9, 91/2)", end with a P row. Bind off.
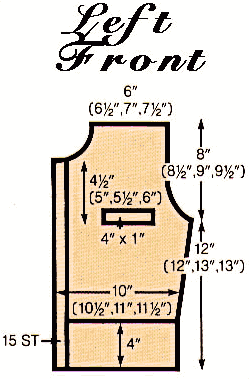
Left Front:
With smaller needles and Main Color A, cast on 55 (59, 63, 67) sts. Work ribbing as for lower back, end with a wrong side row. Change to larger needles.
Row 1:
K 40 (44, 48, 52) sts, place remaining 15 sts on a holder to be worked later on the smaller needles. Work even in st st, starting with a P row. Work even to underarm as for back. Place a marker
for armhole. Work even until armhole measures 4 1/2" (5, 5 1/2, 6)", end with a K row.
Shape Neck:
At neck edge, bind off 2 sts every other row 6 (7, 8, 9) times28 (30, 32, 34) sts. Work even until armhole measures same length as back. Bind off. Place the 15 sts from holder onto smaller needles. Join Main Color A at inside edge and work even in ribbing as established until same length as front to neck shaping (stretch slight when measuring). Bind off in ribbing. Weave front band to front edge. Mark for 6 buttons evenly spaced, placing first 1/2" from lower edge and last approximately 5 1/2" from neck edge.
Right front:
Work to correspond to Left Front, reversing, shaping and working in buttonholes opposite button markers.
Buttonhole:
Row 1: Rib 4 sts at front edge, bind off 2 sts, complete row.
Row 2: Work as established to bound off sts of previous row, cast on 2 sts, complete row.
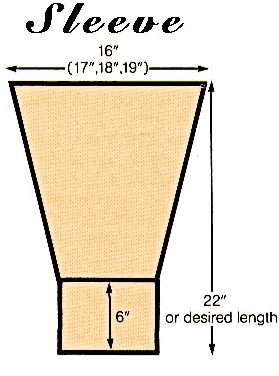
Sleeves:
Note:
Ribbing is made longer so it can be rolled back as shown. With smaller needles and Main Color A, cast on 43 (45, 47, 49) sts. Work ribbing as lower back for 6" (for rolled-back cuff), ending with a wrong side row. Change to larger needles, K 1 row, increasing 3 (5, 7, 9) sts evenly spaced across row — 46 (50, 54, 58) sts. Work st st, starting with a P row. Increase 1 st each end of every 6th row for 13 times (to increase — k 1 st, increase in next st, K to within last 2 sts from end, increase in next st, k 1) — 72 (76, 80, 84) sts. Work even until 22" from beg, or desired length, ending with a P row. Bind off.
Finishing:
Sew shoulder seams. Sew sleeves to armholes, between markers. Sew undersleeve and side seams.
Collar: With larger needles, Contrasting Color B, wrong side facing, starting at 6th rib st from seam — where band is sewn to front, pick up 33 (35, 37, 39) sts to left shoulder seam; pick up 35 (37, 39, 39) sts across back of neck; pick up 33 (35, 37, 39) sts to 6th st to correspond to left front — 101 (107, 113, 117) sts. Starting P 1, K 1, work in ribbing for 3. Bind off in ribbing.
Ribbing for Mock Pocket: With larger needles, Contrasting Color B, cast on 27(27, 29, 29) sts. Work in ribbing as for lower back for 1". Bind off in ribbing. Sew to Left Front in line with armhole as show. Sew on buttons.
Every effort has been made to ensure the accuracy and completeness of these instructions. We cannot be responsible, however, for variances in individual techniques, human errors or typographical mistakes.