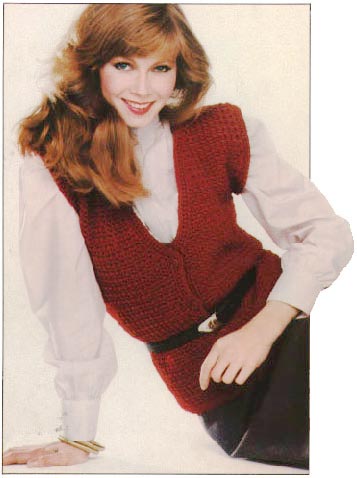
A perfect addition to your fall wardrobe this attractive, long vest can be worn for work or play. Here's a surprise: the instructions are written in plain English, with no abbreviations. Let us know how you like them!
The instructions are for size 8-10. Changes for sizes 12-14 and 16-18 are in parentheses. By the way: Click on the image to the right to see a larger version!
Materials:
- Worsted-weight yarn
- 12 (14, 16) ounces [340 (397, 454) grams] of Color A
- 1 size H crochet hook or whatever size to obtain the correct gauge
- 4 buttons
- Yarn needle for joining
Gauge:
Measuring across, 4 stitches = 1 inch
Finished Measurements:
- Bust: 34 (37, 40) inches
- Width of the back: 17 (18 1/2, 20) inches
- Width of each front not including the front band: 8 1/4 (9 1/4, 9 3/4) inches
Back:
- Chain 70 (76, 82).
- This row is on the right side of the work. Work 1 single crochet in the second chain from the hook and 1 single crochet in each remaining chain. You will now have 69 (75, 81) stitches.
- Chain 1 and turn the work around. Work 1 single crochet in each single crochet.
- Repeat Step 3.
- This row is on the wrong side of the work. Chain 1 and turn the work around. Work 1 single crochet in the first single crochet, then chain 1, skip the next single crochet and work 1 single crochet in the next single crochet. Continue to chain 1, skip the next single crochet and work 1 single crochet in the next single crochet across row. You will now have 69 (75, 81) stitches--35 (38, 41) single crochets and 34 (37, 40) chain-1 spaces.
- Chain 1 and turn the work around. Work 1 single crochet in the first single crochet, then chain 1, skip the next chain-1 space and work 1 single crochet in the next single crochet. Continue to chain 1, skip the next chain-1 space and work 1 single crochet in the next single crochet across row.
- Repeat Step 6.
- Continue to repeat Step 6 for the mesh pattern until your piece measures 12 1/2 (13, 13 1/2) inches from the beginning.
To mark the underarm:
- Tie a short length of contrasting color yarn around the front loop of the first and last stitch of the last row to mark it for the beginning of the armhole.
- Repeat Step 6 until your piece measures 8 1/2 (8 1/2, 9) inches above the underarm markers. Your last row should be a wrong side row.
To shape the shoulders:
- Turn work around. Work a slip stitch in each single crochet and chain-1 space until 19 (23, 25) slip stitches have been worked. Chain 1, work 1 single crochet in the same single crochet, then chain 1, skip the next chain 1 space and work 1 single crochet in the next single crochet. Continue to chain 1, skip the next chain-1 space and work 1 single crochet in the next single crochet until there are 9 (11, 12) chain-1 spaces and 9 (11, 12) single crochets left unworked.
- Fasten off.
Right front:
- Chain 34 (38, 40).
- This row is on the right side of the work. Work 1 single crochet in the second chain from the hook and 1 single crochet in each remaining chain. You will now have 33 (37, 39) stitches.
- Repeat Step 3 of the back twice.
- This row is on the wrong side of the work. Chain 1 and turn the work around. Work 1 single crochet in the first single crochet, then chain 1, skip the next single crochet and work 1 single crochet in the next single crochet. Continue to chain 1, skip 1 single crochet and work 1 single crochet in the next single crochet across. You will now have 33 (37, 39) stitches -- 17 (19, 20) single crochets and 16 (18, 19) chain-1 spaces.
- Repeat Step 6 of the back.
- Continue to repeat Step 6 of the back until your piece measures 11 (11 1/2, 12) inches from the beginning. Your last row should be a wrong side row.
To shape the neck:
- Chain 1 and turn the work around, draw up a loop in the first single crochet, draw up a loop in the first chain-1 space, then wrap the yarn over the hook and draw it through all 3 loops on the hook; work 1 single crochet in the next single crochet, then chain 1, skip the next chain-1 space, and work 1 single crochet in the next single crochet. Continue to chain 1, skip the next chain-1 space and work 1 single crochet in the next single crochet space across the row. You will now have 32 (36, 38) stitches.
- Work as for Step 6 of the back until there is 1 single crochet left unworked, work 1 single crochet in the last single crochet.
- Chain 1 and turn the work around, draw up a loop in each of the first 2 single crochet, then wrap the yarn over the hook and draw it through all 3 loops on the hook, chain 1, skip the next chain-1 space, work 1 single crochet in the next single crochet. Continue to chain 1, skip the next chain-1 space and work 1 single crochet in the next single crochet across the row. You will now have 32 (35, 37) stitches.
- Repeat Step 6 of the back.
To mark for the underarm:
- Tie a short length of contrasting color yarn around the front loop of the first stitch on the last row to mark it for the beginning of the armhole.
- Repeat Steps 7-10 six times. You will now have 19 (23, 25) stitches.
- Repeat Step 7. You will now have 18 (22, 24) stitches.
- Repeat Step 7.
- Repeat Step 8 until the piece measures the same as the back to the shoulder.
- Fasten off.
Left front:
- Repeat Steps 1-5 of the right front.
- Repeat Step 6 of the back until your piece measures 11 (11 1/2, 12) inches from the beginning. Your last row should be a wrong side row.
To shape the neck:
- Work as for Step 6 of the back until there is 1 chain-1 space and 1 single crochet left unworked; draw up a loop in the last chain-1 space, draw up a loop in the last single crochet, then wrap the yarn over the hook and draw it through all 3 loops on the hook. You will now have 32 (36, 38) stitches.
- Chain 1 and turn the work around. Work 1 single crochet in each of the first 2 single crochets, then chain 1, skip the next chain-1 space and work 1 single crochet in the next single crochet. Continue to chain 1, skip the next chain-1 space and work 1 single crochet in the next single crochet across row.
- Work as for Step 6 of the back until there are 2 single crochets left unworked, draw up a loop in each of the last 2 single crochets, then wrap the yarn over the hook and draw it through all 3 loops on the hook. You will now have 31 (35, 37) stitches.
- Repeat Step 6 of the back.
To mark for the underarm:
- Tie a short length of contrasting color yarn around the front loop of the last stitch on the last row to mark it for the beginning of the armhole.
- Repeat Steps 3-6 six times. You will now have 19 (23, 25) stitches.
- Repeat Step 3 of the left front. You will now have 18 (22, 24) stitches.
- Repeat Step 4 of the left front.
- Continue to repeat Step 4 until the piece measures the same as the back to the shoulder.
- Fasten off.
Front and neck band:
- Sew shoulder seams
- Mark the left front edge for 4 buttons, having the first one at the beginning of the neck shaping and the last one even with the first row of mesh at the lower edge. The other 2 buttons should be evenly spaced between.
- With the right side of the work facing you, join the yarn at the lower edge of the right front. Work 1 single crochet in the end of each row to the first neck decrease, work 3 single crochets in the decrease, work single crochets along the right neck edge being careful to keep the work flat, work single crochets across the back of the neck, work single crochets along the left neck edge, having the same number of stitches as on the right neck edge, work 3 single crochets in the first neck decrease, work 1 single crochet in the end of each row to the lower edge.
- Chain 1 and turn the work around. Work 1 single crochet in each single crochet to the center stitch of the first neck increase, work 3 single crochets in the center stitch, work 1 single crochet in each single crochet to the center stitch of the next increase, work 3 single crochets in the center stitch, work 1 single crochet in each single crochet to the stitch on the right front opposite to the first buttonhole marker on the left front. Chain 2, skip the next 2 single crochets, work 1 single crochet in each stitch to the stitch opposite the next marker, chain 2 and skip the next 2 stitches, work 1 single crochet in each stitch to the stitch opposite the next marker, chain 2 and skip the next 2 stitches, work 1 single crochet in each stitch to the stitch opposite the last marker, chain 2 and skip the next 2 stitches, work 1 single crochet in each single crochet to the end.
- Chain 1 and turn the work around. Work 1 single crochet in each single crochet to the first chain-2 space, work 2 single crochets in the chain-2 space, work 1 single crochet in each stitch to the next chain-2 space, work 2 single crochets in the chain-2 space, work 1 single crochet in each single crochet to the next chain-2 space, work 2 single crochets in the chain-2 space, work 1 single crochet in each single crochet to the next chain-2 space, work 2 single crochets in the chain-2 space. Work 1 single crochet in each stitch to the center stitch of the neck increase, work 3 single crochets in the center stitch, work 1 single crochet in each to the center stitch of the next neck increase, work 3 single crochets in the center stitch, work 1 single crochet in each single crochet to the end.
- Fasten off.
Armhole bands:
- Right side facing, join the yarn at the left front underarm marker. Chain 1 and work 1 single crochet in the end of the each row to the back underarm marker.
- Chain 1 and turn the work around. Work 1 single crochet in each single crochet.
- Repeat Step 2.
- Fasten Off.
- Right side facing, join the yarn at the back underarm marker on the other side, chain 1 and work 1 single crochet in the end of each row to the right front underarm marker.
- Repeat Step 2 twice.
- Fasten off.
Finishing:
- Sew side seams.
- Sew the buttons to the left front at the markers.
- Make a chain 50 inches long.
- Work 1 slip stitch in each chain.
- Fasten off.
- Weave the cord through the chain-1 spaces about 3/4 inches below your waistline.
- Knot the ends of the cord.
Every effort has been made to ensure the accuracy and completeness of these instructions. We cannot be responsible, however, for variances in individual techniques, human errors or typographical mistakes.
©2007 Craft Yarn Council of America