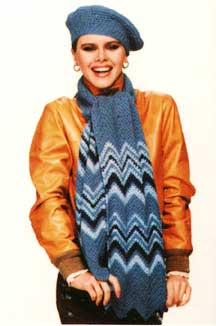
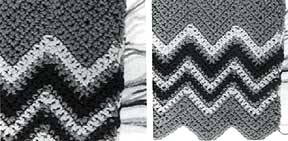
Who said ripples are only for afghans? For this warm scarf we've combined the texture of the popular ripple stitch with alternating rows of color. The beret is worked in the round.
Hat
You will need:
- 4-ply, worsted-weight yarn
- 4 oz. (113 grams)
- Size J crochet hook or whatever size is needed to obtain the correct gauge
Gauge:
- Measuring across, 4 single crochets (sc) = 1"
- Top to bottom, 7 rounds = 2"
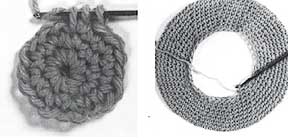
- Starting at the center top of the beret, chain (ch) 4. Join with a slip stitch (sl st) in the first ch made to form a ring.
- Work 8 sc in the ring, do not join to the first sc. Tie a piece of contrasting color yarn or fasten a safety pin through the top of the last sc to mark the end of the round.
- Work 2 sc in each of the 8 sc. You will now have 16 sc. Move the marker to the last stitch of this round.
- Work 1 sc in the next sc and 2 sc in the next sc. Continue this pattern 7 times more. You will now have 24 sc. Move the marker to the last stitch of this round.
- Work 1 sc in each of the next 2 sc and 2 sc in the next sc. Continue this pattern 7 times more. You will now have 32 sc. Move the marker to the last stitch of this round.
- Work 1 sc in each sc. Move the marker to the last stitch of this round.
- Work 1 sc in each of the next 3 sc and 2 sc in the next sc. Continue in this pattern ending with 2 sc in the marked stitch. You will now have 40 sc. Move the marker to the last stitch of this round.
- Work 1 sc in each sc. Move the marker to the last stitch of the round.
- Repeat Steps 7 & 8. You will now have 50 sc.
- Work 1 sc in each of the next 4 sc and 2 sc in the next sc. Continue in this pattern, ending with 2 sc in the marked stitch. You will now have 60 sc. Move the marker to the last stitch of this round.
- Work 1 sc in each sc. Move the marker to the last stitch of this round.
- Repeat Steps 10 & 11. You will now have 72 sc.
- Work 1 sc in each of the next 5 sc and 2 sc in the next sc. Continue to work this pattern, ending with 2 sc in the marked stitch. You will now have 84 sc. Move the marker to the last stitch of the round.
- 1Work 1 sc in each sc. Move the marker to the last stitch of this round.
- Repeat Steps 13 & 14. You will now have 98 sc.
- Repeat Step 14.
- Work 1 sc in each of the next 5 sc, draw up a loop in each of the next 2 sc, then wrap the yarn over the hook and draw it through all 3 loops on the hook to decrease 1 stitch. Continue this pattern, ending with a decrease over the last 2 stitches. You will now have 84 sc. Move the marker to the last stitch of this round.
- Work 1 sc in each sc. Move the marker to the last stitch of this round.
- Repeat Steps 17 & 18. You will now have 72 sc.
- Work 1 sc in each of the next 4 sc, draw up a loop in each of the next 2 sc, then wrap the yarn over the hook and draw it through all 3 loops on the hook. Continue to work this pattern, ending with a decrease over the last 2 stitches. You will now have 60 sc. Move the marker to the last stitch of this round.
- Work 1 sc in each sc. Move the marker to the last stitch of this round.
- Repeat Steps 20 & 21. You will now have 50 sc.
- Work 1 sc in each of the next 3 sc, draw up a loop in each of the next 2 sc, then wrap the yarn over the hook and draw it through all 3 loops on the hook. Continue in this pattern, ending with a decrease over the last 2 stitches. You will now have 40 sc. Move the marker to the last stitch of this round.
- Work 1 sc in each sc. Move the marker to the last stitch of this round.
- Work 1 sc in each sc. Remove the marker.
- Slip stitch in the next sc and fasten off. Work in ends
Scarf
You will need:
- 4-ply, worsted weight yarn
- 8 ozs. Color A (227 grams)
- 4 ozs. Color B (113) grams)
- 4 ozs. Color C
- Size K crochet hook or whatever size is needed to obtain the correct gauge
Gauge:
- Measuring across, 5 single crochets (sc) = 2"
- Point to point, each pattern repeat = 3" across
Finished measurements:
The scarf is approximately 9" by 78".
- With Color A, chain (ch) 40.
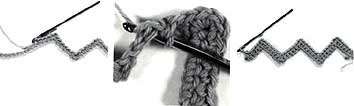
- This row is on the right side of the work. Work 1 sc in the second ch from the hook, 1 sc in each of the next 4 ch, 3 sc in the next ch and 1 sc in each of the next 5 ch; draw up a loop in the next ch, skip the next ch and draw up a loop in the next ch, then wrap the yarn over the hook and draw it through all 3 loops on the hook. Work 1 sc in each of the next 5 ch, 3 sc in the next chain, and 1 sc in each of the next 5 ch; draw up a loop in the next ch, skip the next ch and draw up a loop in the next ch, then wrap the yarn over the hook and draw it through all 3 loops on the hook. Work 1 sc in each of the next 5 ch, 3 sc in the next ch, and 1 sc in each of the last 5 ch.
- Ch1 and turn the work around. Draw up a loop in each of the first 2 stitches, then wrap the yarn over the hook and draw it through all 3 loops on the hook. Work 1 sc in each of the next 4 sc, 3 sc in the next sc, and 1 sc in each of the next 5 sc; draw up a loop in the next sc, skip the next sc and draw up a loop in the next sc, then wrap the yarn over the hook and draw it through all 3 loops on the hook. Work 1 sc in each of the next 5 sc, 3 sc in the next sc, and 1 sc in each of the next 5 sc; draw up a loop in the next sc, skip the next sc, and draw up a loop in the next s, then wrap the yarn over the hook and draw it through all 3 loops on the hook. Work 1 sc in each of the next 5 sc, 3 sc in the next sc, and 1 sc in each of the next 4 sc; draw up a loop in each of the last 2 sc, wrap the yarn over the hook and draw it through all 3 loops on the hook.
- Repeat Step 3.
- Continue to repeat Step 3 for Ripple Pattern until your piece measures 5" from the beginning. Your last row should be a wrong side row. Change to Color B.
- With Color B, repeat Step 3 twice; change to Color A.
- With Color A, repeat Step 3 once; change to Color C.
- With Color C, repeat Step 3 twice; change to Color A.
- With Color A, repeat Step 3 once; change to Color B.
- With Color B, repeat Step 3 once; change to Color A.
- With Color A, repeat Step 3 once; change to Color C.
- With Color C, repeat Step 3 once; change to Color A.
- With Color A, repeat Step 3 once; change to Color B.
- With Color B, repeat step 3 once; change to Color A.
- With Color A, repeat Step 3 five times; change to Color B.
- Repeat Steps 6-14 once.
- With Color A, repeat Step 3 until your piece measures 60" from the beginning. Your last row should be a wrong side row. Change to Color B.
- With Color B, repeat Step 3 once; change to Color A.
- With Color A, repeat Step 3 once; change to Color C.
- With Color C, repeat Step 3 once; change to Color A.
- With Color A, repeat Step 3 once; change to Color B.
- With Color B, repeat Step 3 once; change to Color A.
- With Color A, repeat Step 3 once; change to Color C.
- With Color C, repeat Step 3 twice; change to Color A.
- With Color A, repeat Step 3 once; change to Color B.
- With Color B, repeat Step 3 twice; change to Color A.
- With Color A, repeat Step 3 five times; change to Color B.
- Repeat Steps 18-26.
- With Color A, repeat Step 3 for 5".
- Fasten off.
Every effort has been made to ensure the accuracy and completeness of these instructions. We cannot be responsible, however, for variances in individual techniques, human errors or typographical mistakes.